Sunday, September 11, 2011

Long Cards

Today I'm showing off some long thinner cards I've made:


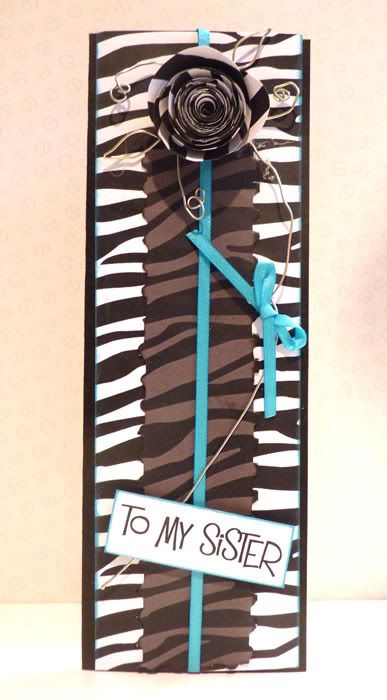
The above card was created with a white textured card base, layered with siler mirror card and zebra stripe printable papers created by me. I made the flowers by cutting out 3 flower from one of my cutting files in 3 graduating sizes then edging them in embossing ink with silver embossing power. I added silver swirls from my stash and clear sticky gem.


I made this card to go with a video I made on using wire. Here is more of my printable zebra print paper as a background and on the paper flower. All is edged in aqua blue Chalk Ink, blue ribbon used by Ribbon Oasis. All leaves and swirls made in silver craft wire purchased from a Book Clubs craft catelogue.


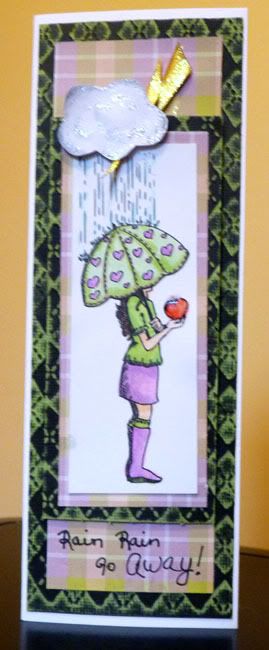
Last but not least.....another white card base to start them I used Coredinations Black with green core cardstock, ran through my Cuttlebug using the argyle pattern embossing folder. I sanded off some of the black to show the green through the pattern. Plaid paper created by me and printed. Digital stamp of the rainy day girl by Mujka Chic and coloured in with my Copics.
I created the cloud and lightning bold myself out of white thin card, coloured with Copics and added fine glitter to them.


That's all for today!


Hugs, Dorothy

Friday, September 9, 2011

It's been awhile

Hi there all! It's been awhile since I posted cards on here as it's been a busy Summer. I've made cards all along but just never got them on the blog here so I'm going to post a bunch now for you to look at.

PSST...I have an alteriour motive as well. I want to try out for the Trimcraft Design Team! They have great products and it's really exciitng for me. Wish me luck!


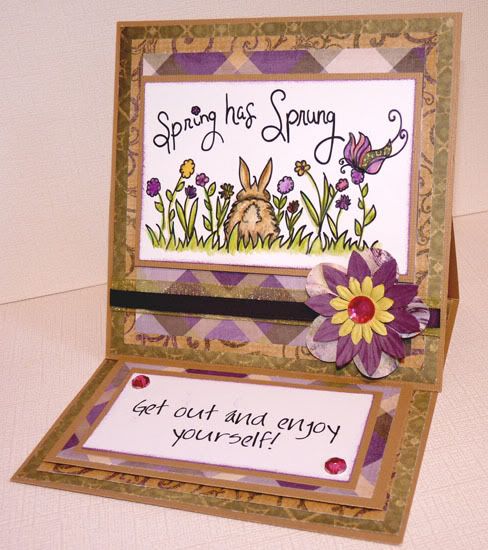
Digital stamp image by Sliekje that I coloured in with my Copic Markers. I used a brown crafty cardstock for the card base and blue and white heavy papers for the sscallop trim cut with my Silhouette machine. The plaid paper is my own digital design. For the flower cluster I used a white Papermania flower and red mini bead trim from my stash. On top of the white flower is a topper design of my own creation. I doubled up red and aqua ribbons (from Ribbon Oasis) and hand stamped the sentiment.


The card above was made with a mosaic image I created myself using stamps, ink and digital brushes. I created the backing paper from this image as well. Sprayed with Cosmic Shimmer (Tropical Yellow) mixed in water and then crumpled before arranging on card. Beige card base is All edges inked with Ranger Distress Ink in Vintage Photo. Pearlised green card stock given to me by a friend. Tag hand stamped by me on same beige cardstock as base. Flower created from my own backing paper, edged in more Distress Ink, misted with water and crumpled. Also adding misc Prima flowers and deep green ribbon. Thick striped ribbon was recycled from a Christmas present from my family in America.


The card above is made from my own designs: dark brown paper, beige geometric patter paper, cupid statue pyramage, sentiment topper. Printed with an Epsom printer.


Papermania white flower, Prima beige flower inked with Distress Ink in Vintage Photo, beige ribbon from Ribbon Oasis .


Pearl hatpin was made by me with a bead and craft wire.

Friday, June 24, 2011

New Cards


Here are 2 new cards using my Paper Shapes Flowers sheets:

Here is a NoteletCard. Inside I stamped Happy Birthday. The notelet on the front of the card is removable and in a pocket.

Just a basic kind of card using this set. I added glitter around the edges of the flowers.


Thursday, May 12, 2011

Purse Wallet Cards

I have some new card templates coming out in my shop and I made a few more cards from them. These are so much fun! My last post had a few purse cards made from them and here are a couple more.

This first card is a briefcase card. I used all digital papers in my card and envelope templates. I printed the card on 200 gsm cardstock using my inkjet printer on both sides of the card. And printed the envelope of good quality printer paper. Then added some mauve wrinkled handmade paper layers along with a hand stamped HELLO sentiment and dotted ribbon.


This card is a tri fold man's wallet card. It's hard to tell from the photo but it's in 3 parts and is decorated inside. Iused leather look digital paper from one of my own kits and printed both sides of the cardstock with my inkjet printer. I layered this golf foil metal look holey sheet along with gold mirri board, pearl green paper and I wanted some brown on there but didn't want to use brown cardstock. It would be too heavy for the front so I took a piece of thin fabric type beige paper and used my Ranger Distress Ink and blender tool and made it brown. It's finished with gold peel off words and the word DAD I created in Photoshop and cut the letters out with decoupage scissors. (There's more of that plaid brown paper on the inside of the cards along with more layers of gold mirri and green pearly paper.) I added some gold glitter pearls to each letter as well.


Wednesday, April 20, 2011

More Cards toShow Off

I am doing lots of assembling of new products, namely my Purse Card PNG Templates. I needed to write assembly instructions for a PDF, I made some cards and even made a video! So I printed off a whole bunch of my digital papers and templates and made some cards. Hope you like them!

This first card was made using my Stars in Your Eyes digital paper pack. I printed off about 5 different papers and made this card using a flower punch and ribbon:


This was just one of the cards made from one printing of one of my card making sheets. I really love how it turned out. I just used 3d foam pads to raise up the different parts:


These last 2 cards were made using my Purse PNG Templates. I used them with digital papers I made, then print, cut and created! LOL


Monday, March 14, 2011

Couple of Cards

I was ging through my stash..as so often we all do and sometimes you find something and you have no idea what to do with it so you have a bit of a play...

this card here is exactly that. I found this pack of thick handmade paper I had bought really cheap in a dump bin at this Book Store at the mall. The colours were a tad funkadelic but I love adding texture to cards so for a few quid I got this huge pack. There were all kinds of sizes and types of paper but there were these squares of green dotted thick textured paper with tiny foil bits in it and I thought I would make nice flowers. So out with my new Nesties and Cuttlebug and I cut out alternating size scalloped circles along with a few using beige sheer mulberry paper. I edged the flowers with a white gel pen with hand drawn stiching.

Just slapped them on a square cards, a few corners I made, a jewel brad in the middle and voila!


This next one is just a play with a DCWV glitter card stack and a puffy flower embellie I got in my Christmas stocking. I used the same Nesties die for the flowers and some purple ribbon down the centre. The Birthday Gal sentiment is from my stash of printables. I like to print out sheets of sentiments in different sizes and occasions also using different fonts and keep them in a file folder near my craft table. I usually just print them in black, pink or purple on thin white card. I then just cut out one that I like and trim it to fit the card I'm doing. I suggest you all give it a try.


Thanks for looking!

Monday, March 7, 2011

Lots of cards

I got busy and made some cards this weekend. I did a lot of printing for these...all of these cards were made with my own printables which include my own digital stamps, sheets and backing paper designs. Hope you like them!

This first one was created using my Funk Flower sheet with flower decoupage and funky backing paper (printed on good quality paper), green card, gold mirri board, pink ribbon and a vellum happy birthday sentiment that came with a DCWV paper stack (which I coloured in with my Copics.)


This next one all the papers and flower digi stamp were my creation and printed out on 160 gsm thin cardstock. The flower digi stamps were coloured in with my Copics and the hello sentiment was from a new clear mini stamp set I just got. All are stacked on gold mirri board with a thin pick satin ribbon criss crossed. Please ignore the black ink smudge..i made an oops with my rocker block...lol.


This is a large A5 card made with an A4 blue card sheet and I rounded the corners. The only parts printed out were my heart digi stamp and the Happy Mothers Day sentiment which are on thin white cardstock. The thick papers used are fron this thick A5 stack I got at a craft show a few years ago..it had no cover or name on it but there are 4 pastel colours in it. Each colour had sheet of printed vellum, a patterned paper, embossed card and a pretty swirly design. I just stacked everything and added a blue ribbon...coloured in with Copics.

Last but not least....I made this card with my newest digital stamp set and my own backing paper designs all printed out on thin card. This is my first easel card I've ever made. I coloured in the digi stamp with my watercolour pencils and used a water brush to blend. I really love my watercolour pencils. I also added a green glittery ribbon from a discontinued Laura Ashley ribbon stack and a purple satin ribbon from Ribbon Oasis...last but not least Prima Flowers and stick on gems.